The Modern CPU allows the system to protect the memory from violated access. Which means that the system may be able limit the memory that a program can access.
Protected mode is an operational mode of the Intel 80286-compatible CPU. Operation mode of CPU decided how CPU uses registers, seeks memory address and does other works.
Usually, the CPU enables the protected mode once the operation system is booted. Once the CPU enters protected mode, the OS is able to perform modern features like multi-tasking, paging, virtual memory, etc. Also, protected mode enables the OS obtaining the fully control of the program, which means that OS can monitor what the program does, how to perform tasks, how much memory the program allocated etc. Even if the program caused memory leak, the system is still able to free the memory via killing the program that caused memory leak.
Also, the program may not able to directly access the memory that not allocated for the program. For example, the program cannot access the memory address that storing the system binaries, or another program memory area.
However, to finish necessary tasks, the OS still offers some opportunities to allow the program to access some sensitive information of the system or other applications.
Open Source means that the source code of a software is public visible. Usually, Open Source code can be used for free with some limitation, e.g. the software used open source code should be a open source software, there are limitation of re-development based on the open source code, or the code cannot be used for business purpose for free, and so on.
Most of Open Source projects are under a specific open source license.
In this blog, I will choose Drupal and Linux Kernel as example to show how open source community works.
Drupal
Drupal is an open source content management system(CMS) framework that is written in PHP and it is distributed user the GNU General Public License. Drupal is developed by Drupal community and is free.
Before reporting an issue, the user should create an account and login to drupal.org. After user logged in, the Drupal website will allow user to fill a form and submit the form to drupal.org. Then drupal community will review the issue and assign a status to the issue in the issue page. Depends on different situation, Drupal team may fix the issue or not.
Linux Kernel
Linux kernel is a free and open source operating system kernel. The code in Linux Kernel are under different licenses, e.g. GPL, BSD, MIT, etc.
Linux kernel issues will be listed and reported on https://bugzilla.kernel.org/ . If user wants to report an issue, user must create an account or login to continue. After an issue is reported, the issue will be assigned status of NEW. After Linus and the people in the team tested and verified the bug, they will assign the issue other status like VERIFIED, FIXED, REJECTED, etc.
Both of Linux kernel and Drupal allow public user to report bugs and their team will try to verify and fix the bugs. The advantage is the billion of people on the planet help them to test their software and report bugs on time.
However, there are also some drawbacks for this approach. The team cannot make sure that the “bug” is not caused by user’s skill level. The user may does not have skill to fix an error and they report it as “bug”. In this case, the community needs lots of time to verify and answer user’s questions.
However, open source is the trends of programming. Open Source communities contributed countless valuable projects and software. Also, it helps programmers on the world to improve their coding skills.
 define WIDTH 	5 ; width of graphic
 define HEIGHT 	5 ; height of graphic

 	lda #$00	; create a pointer at $10
 	sta $10		;   which points to where
 	lda #$02	;   the graphic should be drawn
 	sta $11

 	lda #$00	; number of rows we've drawn
 	sta $12		;   is stored in $12

 	ldx #$00	; index for data
 	ldy #$00	; index for screen column

move:
	jsr clearScreen
	;brk
	jsr moveDown
	jsr moveRight
	;draw will modify our pointer, we need to backup and reset it later
	lda $10
	sta $14;backup
	lda $11
	sta $15
	jsr draw
	lda $14
	sta $10;reset
	lda $15
	sta $11
	;brk
	jsr move

 draw:
	lda data,x
 	sta ($10),y
 	inx
 	iny
 	cpy #WIDTH
	;brk
 	bne draw

 	inc $12		; increment row counter

 	lda #HEIGHT	; are we done yet?
 	cmp $12
 	bne continue	; if not equal, go to continue
	;beq done;	; comment out bne continue and beq done > movin

	;lda $04;
	;sta $11
	ldx #$00; //reset index
	ldy #$00;
	sty $12
	rts

continue:
	;brk;
	lda $10		; load pointer
 	clc
 	adc #$20	; add 32 to drop one row
 	sta $10
 	lda $11	; carry to high byte if needed
 	adc #$00
	cmp #$06
	beq done
 	sta $11

 	ldy #$00
 	beq draw
	;rts

 done:	brk		; stop when finished
	;rts

 data:
 dcb 00,03,03,03,00
 dcb 07,00,00,00,07
 dcb 07,00,00,00,07
 dcb 07,00,00,00,07
 dcb 00,03,03,03,00

moveRight:
	sty $13
	ldy $10
	iny
	sty $10
	ldy $13
	rts

moveDown:
	lda $10
	clc
	adc #$20 ;add a line
	sta $10
	lda $11
	adc #$00
	cmp #$06
	beq done
	sta $11
	rts

resetPage:
	lda #$02
	sta $11
	rts

clearScreen: ;we can create another sub route called clearPrevious to avoid flashing screen
	sta $22 ;backup registers
	stx $23
	sty $24

	lda #$00	;   create a pointer at $80
 	sta $20		;   which points to where
 	lda #$02	;   the graphic should be drawn
 	sta $21
	lda #$00 ;black color
	ldy #$00 ;
mloop:
	sta ($20), y
	iny
	bne mloop

	ldx $21
	inx
	stx $21
	cpx #$06
	bne mloop

	lda $22 ;revert registers
	ldx $23
	ldy $24
	rts
The code above is what I’ve done so far.
In Lab 3 our group will create a shape that will bounce around that will reflect when it reaches screen edge.
So far, the shape is able to move from top left to bottom right. But when the it is drawing the picture at bottom right, it will write data to 0x0600, where our program located. Then the program crushed.
Procedure:
When the program starts, we load the image from dcb data. and draw it at the address where our pointer point at. Then we modify the pointer, clear screen, then draw it again.
move:
	jsr clearScreen
	;brk
	jsr moveDown
	jsr moveRight
	;draw will modify our pointer, we need to backup and reset it later
	lda $10
	sta $14;backup
	lda $11
	sta $15
	jsr draw
	lda $14
	sta $10;reset
	lda $15
	sta $11
	;brk
	jsr move
However, draw modifies our pointer to complete drawing, therefore, we backed it up and restored it after drawing finished. After restoring pointer, we come back to move sub route, and clear screen again, then modify our pointer and draw it again.
clearScreen: ;we can create another sub route called clearPrevious to avoid flashing screen
	sta $22 ;backup registers
	stx $23
	sty $24

	lda #$00	;   create a pointer at $80
 	sta $20		;   which points to where
 	lda #$02	;   the graphic should be drawn
 	sta $21
	lda #$00 ;black color
	ldy #$00 ;
mloop:
	sta ($20), y
	iny
	bne mloop

	ldx $21
	inx
	stx $21
	cpx #$06
	bne mloop

	lda $22 ;revert registers
	ldx $23
	ldy $24
	rts
Clear screen is simple. we fill 00 from address 0x0200 until 0x05FF. But it is very slow. This is planned to be optimized. Because we know where we drew, so we just need to erase that addresses.
moveRight:
	sty $13
	ldy $10
	iny
	sty $10
	ldy $13
	rts

moveDown:
	lda $10
	clc
	adc #$20 ;add a line
	sta $10
	lda $11
	adc #$00
	cmp #$06
	beq done
	sta $11
	rts
moveRight and moveDown is also simple.
In moveRight, we just increased pointer index by 1, so it moves right 1 pixel. But the shape does not reflect after it reaches right edge. We need to check if it reaches right edge and change the increase so decrease if it reaches right edge.
In moveDown, we increase pointer index by 32(hex 20). if there is a borrow, it means we need to switch page(e.g. from 0x0200 to 0x0300), so we add 0. if there is a borrow, it will add 1 instead of 0.
We will finish this lab next week. We plan to create an X and Y coordinator function to manage where our shape is, so we can easily to deal with the reflection issue.
To under 6502 assembly language, the terms are necessary to understand.
Address
Address is the numeric reference to a specific memory location. 6502 is a 8-bit cpu, therefore, every memory location contains 8 bits. Address is recorded as hex number. it starts from 0x0000 to 0xFFFF in 6502. So we can calculate that the memory size of 6502 is 64KB.
Addressing Mode
Addressing Mode is a method used to find the data(operands) for an instruction. In 6502, we need 16 bit to save a pointer. So when accessing a pointer, e.g. 0x1234 saved at 0x0010 and 0x0011, when we access the pointer, we need to access 0x0010 – lda $10. The operand of this operation looks like indirect, but it actually is zero-page. The reason the data is saved in 00 page(0x00??). For the statement that does not have an operand but it is dealing with data, usually the operands of those statements are Accumulator – Register A. For example: asl
Assembly Language
Assembly Language is a language that can directly control machine but still human readable. Assembly language will directly translated to machine code with out any other process.
Bitwise Operation
Usually, bitwise operation means shifting right and left. Shifting left means multiple the number in register by 2, shift right usually means divide the number in register by 2. Bitwise does not do any logic operation, so it is very fast. Also, if we need to access a 1-bit data, we need to use bitwise operation. For example: we want to know what is the first bit at 0x1000, we need to get the 8 bits data, and shift right 7 times. in this case, we get the first bit at 0x1000
Register
Register is a fast internal storage location for data with in a CPU. In 6502, we use 3 registers: A, X, Y. A is accumulator, x and y are general registers. CPU can directly control registers. When need to process data in memory, CPU takes the data from the memory to register, then put it back. Register is much faster than memory, so it using registers effectively is very important for optimizing software.
Stack
Stack is a region of memory used for first-in, last-out data storage. The stack is in memory, not inside of the CPU. In 6502, the stack located at 01 page. Stacks start from high address, therefore, the stack from 0x0100 to 0x01FF
Program Counter
Program Counter is a pointer to currently-executing code. When a operation executed, the program counter increases. Therefore, it always points at next statements. When program counter points at address which the content in the address is 00, program ends.
Status Register
Status Register is a collection of status and mode flags. CPU needs to save some status, for example, there is a overflow after an add operation, in this case, we need a place to store status like this. In 6502, it is (bit 7)NV-BDIZC(bit 0). It represents
N: Negative flag, set true if the result of an operation is negative.
V: Overflow flag, when an arithmetic operation resulted in a result of greater than FF or less than 00, V set
-: Not Used
B: this is set when encountered interrupt.
D: This is decimal mode status flag. Use binary coded decimal to do add or subtract operation
I: This is Interrupt enable or disable flag. Disable not available if it is set
Z: Zero flag. This is set when a operation resulted in 0; cleared when a operation resulted a non-zero value.
C: Carry flag. This is set when borrow is required; cleared when borrow is not required. most used flag in 6502 processor.
Disassembly
Translate machine language to human readable language – assembly language.
Word Size
Word Size is a description of the allocation of storage within memory
In Lab 2, We learned Assembly language base on 6502.
Here is the code:
lda #$00	; set a pointer at $40 to point to $0200
	sta $40
	lda #$02
	sta $41

	lda #$07	; colour

	ldy #$00	; set index to 0

loop:	sta ($40),y	; set pixel

	iny		; increment index
	bne loop	; continue until done the page

	inc $41		; increment the page
	ldx $41		; get the page
	cpx #$06	; compare with 6
	bne loop	; continue until done all pages
After we run the code above on 6502 Emulator, the screen will be filled by yellow.
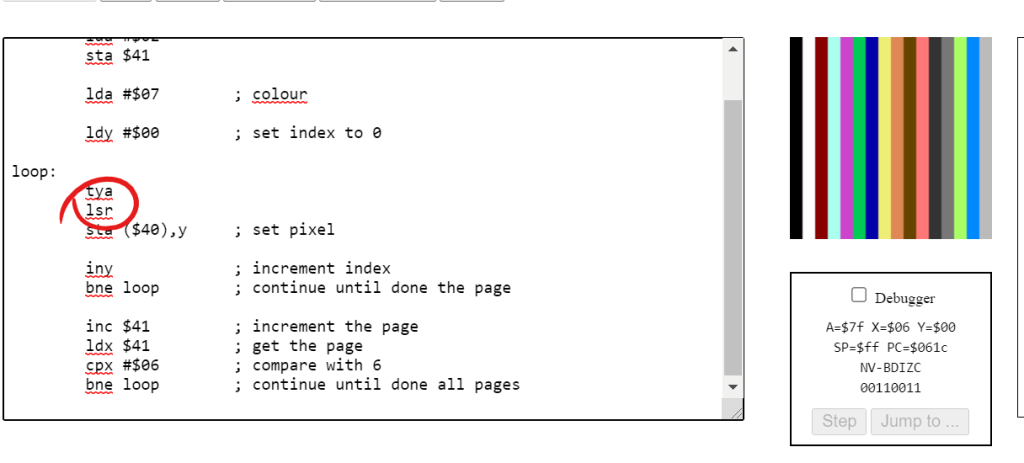
Now we add tya between “loop” and “sta ($40), y” the screen will be filled by different color lines. The reason why it happens is that we write the data in register A to the screen pixels. Before we add tya, the data in a is #$07(yellow). But after we added tya, the data in register A will be changed in every loop from 00 to ff, the screen only take the last digit of the hex code as color code, so it only shows 16 color(0 – f). The screen size is 32*32(1024 pixels) and the screen contains 4 pages, from 0x200 until 0x50FF. so every page contains 256 (16*16) pixels and controls 8 (256 = 8*32) horizontal lines on the screen. Therefore, 16 colors pixels circle(0 – f) shows twice in a line cause a line has 32 pixels.
Now, let’s add lsr after tya. lsr shifts bit right for the data in register A, where saving the data that will be write to the screen. What gonna happen?
Well, it divides the unsigned integer stored in register A(we shift right once so that the integer is divided by 2^1). In this case, after we go through a line, the 16 colors circle only shows once and every color is showed twice.
Output when we shift bit right once
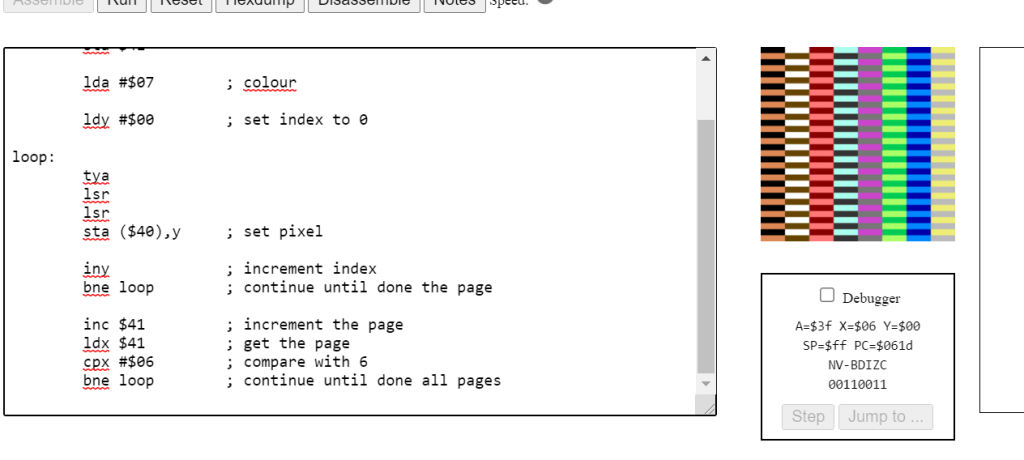
What if we add lsr once again?
We can predict that the color code will be divided by 4(2^2). In this case, we need 64 (loop 64 times, 16 = 64/4) pixels to show a 16 color circle and every color will be shown 4 times. We believe the vertical line will be break cause the number for pixels in each line cannot be divided by loop times of a circle of showing all colors.
shift right twice, lines break
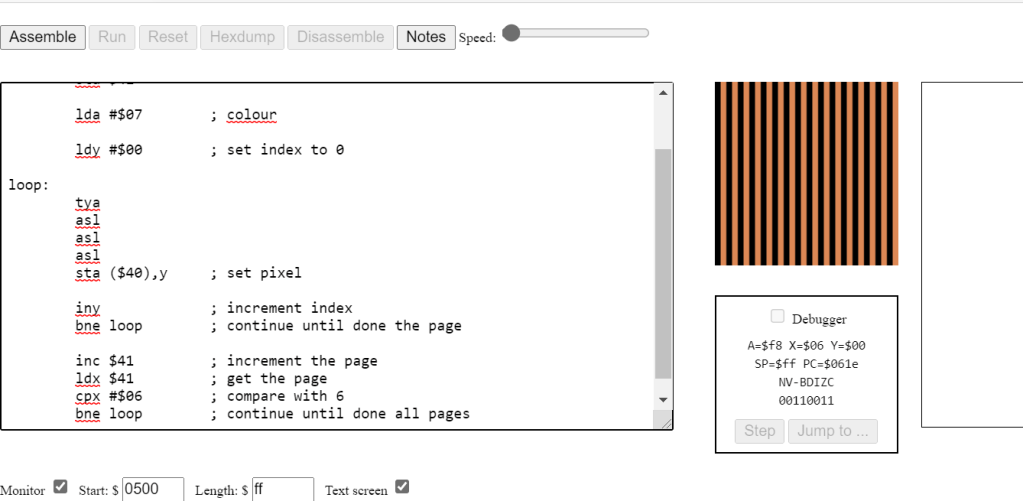
What if we delete all lsr and write an asl between loop and sta ($40), y?
In this case, we can make sure that the last digit of data in register A will not be an odd number because the data in register A is multiple by 2.
we can see the last digit will be 0, 2, 4, 6, 8 ,A, C, E, 0…
There are only 8 colors in a color circle!
Also when we shift again, the number of colors reduces by half. Until there will only be 0 at the last of the color data, the screen will only show black
result of shift left 3 times, only 2 colors left.
Now we play around with register A, what if you do something to register Y, what will be the result?
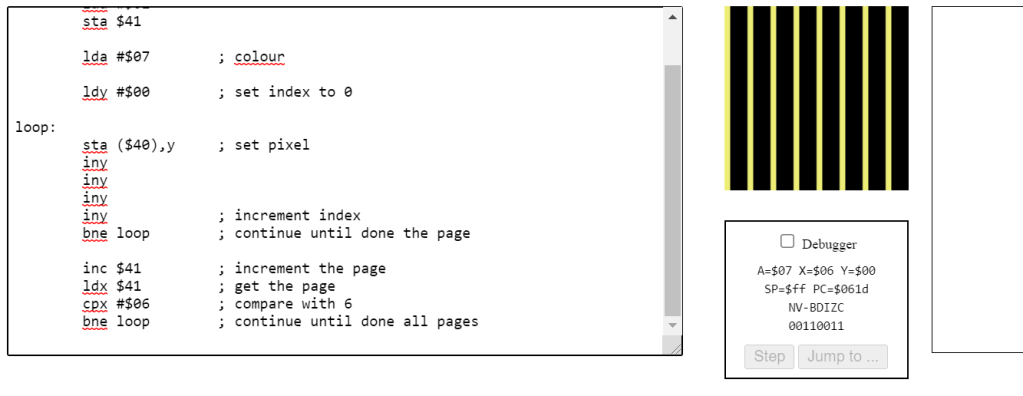
Let’s clear all tya and asls, and add an extra iny.
In this case, our program will not go through the whole screen, it will actually go through half of the screen because the y will never be an odd number before it reach 00 – end of the loop. So, if there are 4 iny, the program will only render one fourth of the screen.
result of we having 4 inys
What if we have 3 inys?
This will be an interesting questions. For 3 inys, the program will render 0, 3, 6, 9, C, F for the first circle. What’s next? the data got overflow, so F+3 will be 2!
Then its rendering, 2, 5, 8, B, E then overflow again, E+3 is 1 and start loop again: 1, 4, 7, A, D. After we add 3 again, the data will be 0, loop end. so that can say that if we increase y odd times, it will finally render the whole screen – just slower!
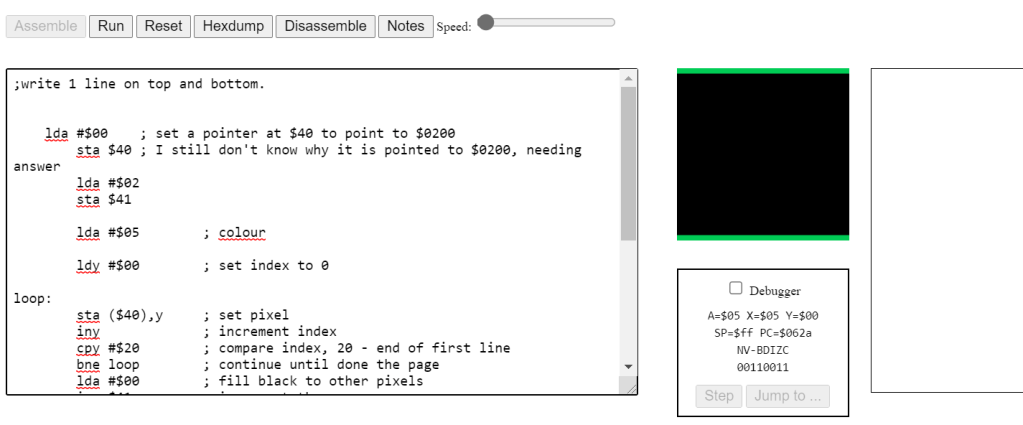
write 1
Writes 1 – lines on the top and bottom:
;write 1 line on top and bottom.


    lda #$00	; set a pointer at $40 to point to $0200
	sta $40	; I still don't know why it is pointed to $0200, needing answer
	lda #$02
	sta $41

	lda #$05	; colour

	ldy #$00	; set index to 0

loop:
	sta ($40),y	; set pixel
	iny		; increment index
	cpy #$20	; compare index, 20 - end of first line
	bne loop	; continue until done the page
	lda #$00	; fill black to other pixels
	inc $41		; increment the page
	ldx $41		; get the page
	cpx #$05	; if last page of the screen - last 1/4
	bne loop

loop2:
	;sta ($40),y ; this line is not needed
	iny ; increase index
	cpy #$E0 ; compare index, E0, last line of the page
	bne loop2
	lda #$05 ; set green color
loop3:
	sta ($40),y ; set pixels
	iny
	bne loop3
In this approach, we render the first line of screen: 0x0200 – 0x022F, first 32 pixels in first page.
Then we will ignore all other pixels of the page until we got 0x05E0, the last line of the screen, last 32 pixels in last page. then we render it, we got lines on the top and bottom
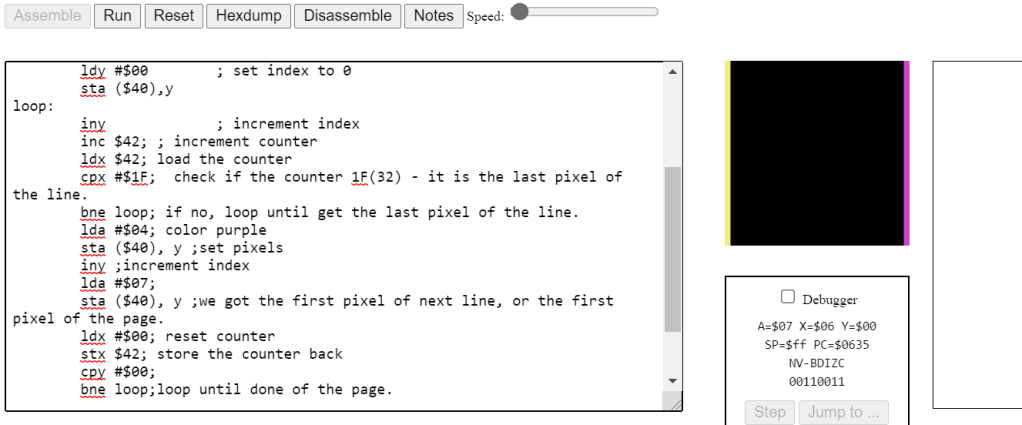
Write 2 – lines on the left and right:
; write 2 line left and right

	lda #$00	; set a pointer at $40 to point to $0200
	sta $40
	lda #$02
	sta $41
	lda #$00
	sta $42 ;counter to 0

	lda #$07	; colour yellow
	ldy #$00	; set index to 0
	sta ($40),y
loop:
	iny		; increment index
	inc $42; ; increment counter
	ldx $42; load the counter
	cpx #$1F;  check if the counter 1F(32) - it is the last pixel of the line.
	bne loop; if no, loop until get the last pixel of the line.
	lda #$04; color purple
	sta ($40), y ;set pixels
	iny ;increment index
	lda #$07;
	sta ($40), y ;we got the first pixel of next line, or the first pixel of the page.
	ldx #$00; reset counter
	stx $42; store the counter back
	cpy #$00;
	bne loop;loop until done of the page.

	inc $41		; increment the page
	ldx $41		; get the page
	cpx #$06	; compare with 6
	bne loop	; continue until done all pages
write 2 result
If we want to render the line on the left and right, we can render the first pixel and the last pixel of every line. We know that every line has 32 pixels, so we need a counter to know if we are in the the last pixel of a line – next pixel must be the first pixel of next line!
But there is an issue, when the program reach the last of a page, it cannot get the first pixel of next page because the address is pointed by the pointer! However, our program still rendered 2 lines as expected. Why?
After we reached the last pixel of a page, we need try to get the first pixel of next line and the machine does give our program a pixel – but it is the first pixel of current page instead of the first pixel of next line!
My impression of the Assembly Language:
It scared me when I first time heard about it. But actually when I am doing it, it is not hard as I thought. It is actually let the programmer program a machine step by step in a lower level. We have more control of memory so that we can write a high performance program.
I played a game call Human Resources Machine, which is very similar with writing in Assembly Language.
The loop, if, switch statements in higher level language like C/C++ are actually implemented by Jump function in Assembly!
This is the first post on my new blog. I’m just getting this new blog going, so stay tuned for more. Subscribe below to get notified when I post new updates.